Strategy
Gameplay
| Playstyle | |
|---|---|
| Slardar is a physical damage-based carry and initiator who specializes in chasing down and crushing his foes. While he is very straightforward and easy to learn, mastering his abilities can allow players to unlock his true potential. | |
| Pros | Cons |
|
|
Ability Builds
| Support Slardar | ||||||||||||||||||||||||
|---|---|---|---|---|---|---|---|---|---|---|---|---|---|---|---|---|---|---|---|---|---|---|---|---|
| 1 | 2 | 3 | 4 | 5 | 6 | 7 | 8 | 9 | 10 | 11 | 12 | 13 | 14 | 15 | 16 | 17 | 18 | 20 | 25 | |||||
| Hardlane slardar | ||||||||||||||||||||||||
|---|---|---|---|---|---|---|---|---|---|---|---|---|---|---|---|---|---|---|---|---|---|---|---|---|
| 1 | 2 | 3 | 4 | 5 | 6 | 7 | 8 | 9 | 10 | 11 | 12 | 13 | 14 | 15 | 16 | 17 | 18 | 20 | 25 | |||||
Talents
| Hero Talents | ||
|---|---|---|
| Corrosive Haze Undispellable | 25 | -3s Slithereen Crush Cooldown |
| -3 Corrosive Haze Armor | 20 | +125 Slithereen Crush Damage |
| +50 Bash of the Deep Damage | 15 | +325 Health |
| +0.2s Slithereen Crush Stun Duration | 10 | -2s Guardian Sprint Cooldown |
Notes:
- The health talent increases the max health capacity and keeps the current health percentage.
Tips & Tactics
General
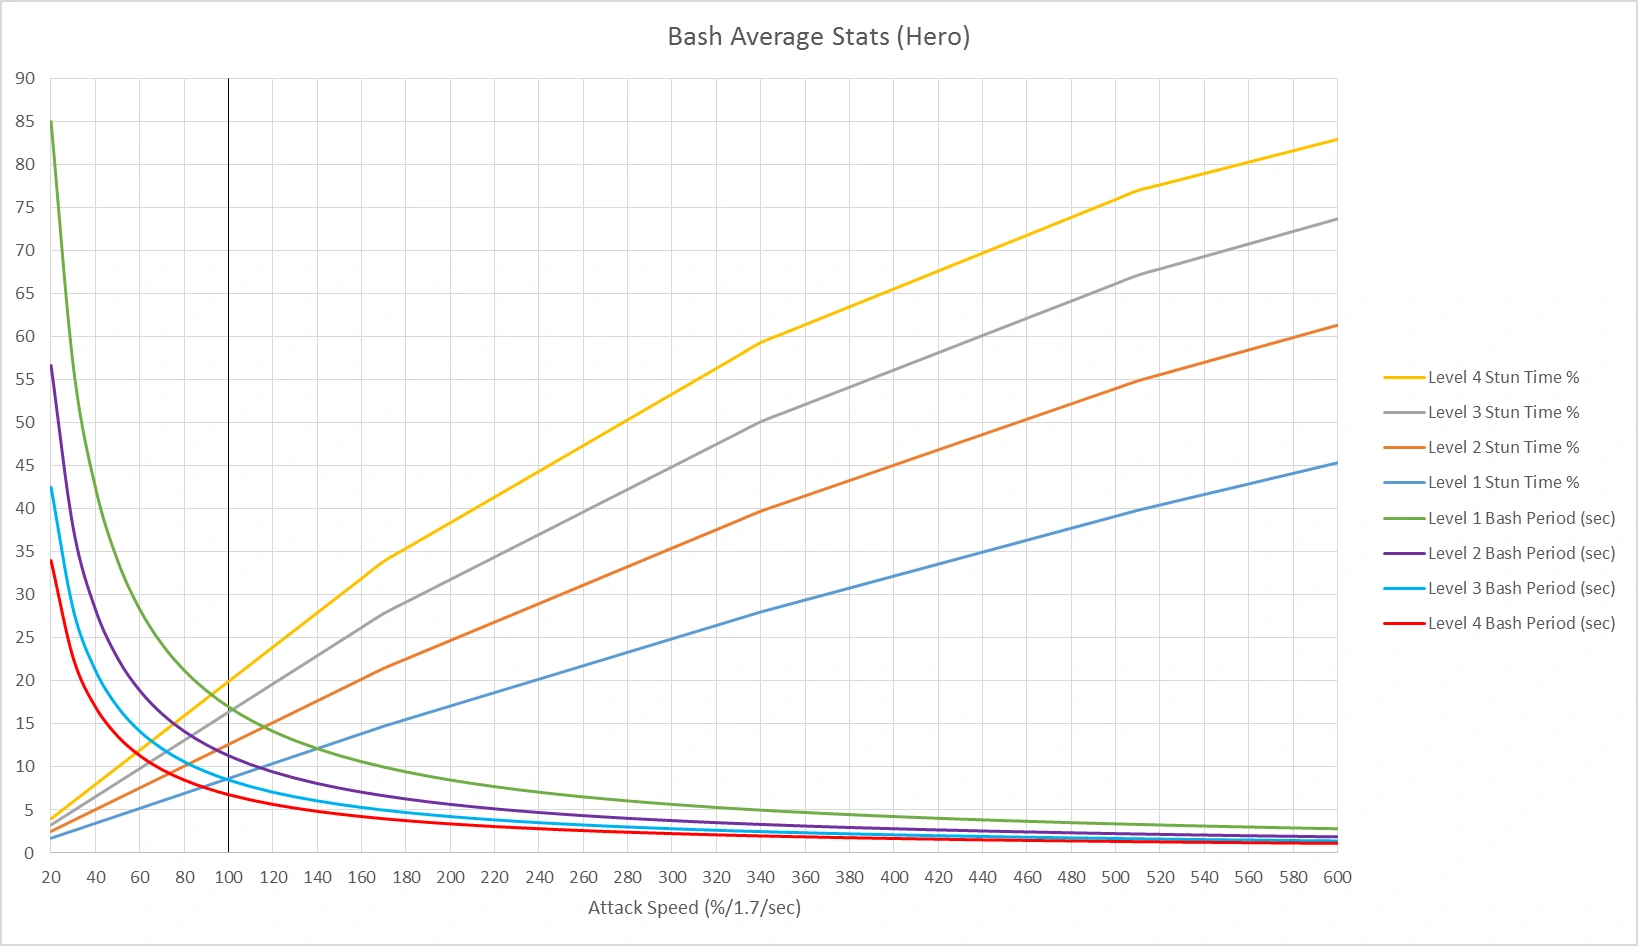

Bash of the Deep average stats (hero)


Bash of the Deep average defense value (hero)
- With his wealth of strength and agility growth, Slardar is a very potent fighter, able to directly engage and defeat most enemies in head-on engagements, especially once he has farmed up the items he needs. However, he also has among the lowest intelligence, base and growth, of all strength heroes in the game, meaning that he suffers from being unable to sustain casting his spells over a prolonged period of time.
- In order to become a threat in any game, Slardar must be given farm priority so that he can buy the items necessary to engage the enemy. However, unlike most other carries, Slardar's abilities can make him a threat to enemies in the laning stage, as he possesses both a mobility spell and a hard disable, meaning that he can cast follow-up stuns when his supports initiate. This means that Slardar has the potential to get early kills and snowball into becoming a major threat before the enemy team is prepared to deal with him.
- In most cases, Slardar is played as a safe lane carry, as he is a melee hero who can easily be harassed by ranged opponents. However, with Guardian Sprint and Slithereen Crush, he can help his lane supports to net kills against the enemy offlaner, allowing him to farm up the items needed to be able to fend for himself and free up his supports to roam and gank the other lanes.
- Due to the mobility provided by Guardian Sprint, Slardar can sometimes be played as an offlaner, as he can easily outrun enemy attempts to gank him. By focusing on survivability and gaining levels more than on farming, Slardar can use the solo experience he gets to reach level 6 faster, and then roam and gank using his ultimate to easily destroy his foes.
Abilities
Guardian Sprint
- Guardian Sprint is a spell that greatly increases Slardar's movement speed.
- As a mobility spell, Guardian Sprint is a good spell to max out early in a match, as the increased movement speed can allow Slardar to more easily chase down enemies or escape ganks, important for increasing his gold gain or preventing gold loss in the early game.
- Guardian Sprint is primarily used to close the distance to a foe in order to land a successful Slithereen Crush, particularly in the early game if an enemy is caught out of position. It is also a strong mobility spell that allows Slardar to quickly traverse between lanes or reach a combat area faster, and can save him time and mana due to negating the need to use a Town Portal Scroll.
- Because it provides phased movement while it is active, Guardian Sprint allows Slardar to ignore unit collision while pursuing or fleeing enemies. When chasing foes, this allows Slardar to simply run through impeding creeps, as well as the target itself, to get ahead to stun them with Slithereen Crush. When fleeing, Slardar can run straight through creep waves, forcing enemies to path around and possibly lose him.
- With its low cooldown and high active duration, Slardar is able to use Guardian Sprint with great uptime to be very active on the map.
Slithereen Crush
- Slithereen Crush is a basic disable that stuns all enemies in an area around Slardar, dealing physical damage and slowing them for a short time at the end of the stun.
- Because its stun duration does not increase with level (only the slow and damage), Slithereen Crush should not be Slardar's first ability to be maxed out. The priority should be given to his other two abilities.
- In order to reliably stun enemies with Slithereen Crush, a Blink Dagger is absolutely crucial. Given good timing and opportunity, Slardar can stun multiple enemies with a single cast, making him a strong team initiator.
- With an 8 second cooldown at all levels, Slithereen Crush can allow Slardar to repeatedly lock down enemies as he chases them, especially when combined with Guardian Sprint. Combined with Corrosive Haze and a Blink Dagger, this makes Slardar extremely difficult to escape from.
- Slithereen Crush is easily Slardar's most expensive spell, so always be sure to cast it carefully. Missing Slithereen Crush can not only result in a missed kill but will also cost Slardar another opportunity at a future kill if he does not have mana replenishment handy. Always make sure to treads switch to intelligence when casting it, in order to reduce the strain that it puts on Slardar's mana pool.
- After the stun, enemies will have their attack and movement speed slowed for a short time. This can render enemies unable to easily fight back or flee, as the movement speed reduction can allow Slardar to more easily body-block their movements, provided that Guardian Sprint is not active.
Bash of the Deep
- Great ability to harrass fragile heroes in the lane.Slardar can build stacks on lane or jungle creeps, then attack a hero for high damage.
- Support Slardar may want a value point in Bash of t.he Deep to stun the enemy following Slithereen Crush.
- Slardar should focus on building attack speed items for the late game in order to make the most of Bash of the Deep. As the ability pierces spell immunity, Bash of the Deep is especially valued against enemies with Black King Bar.
- Bash of the Deep's buff counter is visible to all players.More experienced ones may predict your strategy and be more careful.Alas, it could be wiser to surprise a hero from the fog of war.
Corrosive Haze
- Corrosive Haze debuffs the target enemy's armor, greatly reducing their resistance to all sources of physical damage.
- Corrosive Haze is an extremely strong single-target debuff, capable of rendering even the toughest hard carry unable to withstand attacks from Slardar and his team. As well, it is the linchpin that amplifies the strength of all of Slardar's spells, as both Slithereen Crush and Bash of the Deep deal physical damage.
- Because of its spammability, Corrosive Haze can be repeatedly cast before or during a teamfight in order to break multiple enemies' armor. This will soften them up not only for Slardar's attacks, but those of his teammates as well, especially allied carries with high physical damage output. Its low cooldown also makes it a good candidate to trigger an enemy's Linken's Sphere.
- Remember that Corrosive Haze will provide True Sight over its target, which allows Slardar and his team to see in an area around the enemy and even track them through invisibility. This can allow Slardar to easily pursue and crush enemies that he has cast his ultimate on, even mobile heroes with escape abilities like Bounty Hunter, Riki, Queen of Pain and Puck. Casting Guardian Sprint to chase after enemies, using his own Blink Dagger to traverse impassible terrain, and stopping them in their tracks with Slithereen Crush is what Slardar is best known for once he has gained vision over them with his ultimate.
- Beware, even though Corrosive Haze has a very low mana cost, repeated casting can still drain Slardar's mana very quickly. If time permits, treads switching between casts can allow Slardar to have more mana available for future engagements when he may need to cast multiple instances of Slithereen Crush.
- Due to its extremely low cooldown, Corrosive Haze can be used as a farming spell to allow Slardar to more easily kill larger jungle creeps. As well, it can be cast on Roshan when taking the Aegis, greatly reducing the time required to kill him, and is a good way to break Linken's Sphere on enemies prior to engagement.
- While it is an easily dispellable debuff, Corrosive Haze can be cast on spell immune enemies. Combined with Bash of the Deep, Slardar can be a powerful threat even against enemies with Black King Bar.
Items
Starting items:
- Tango provides health regeneration to combat harassment.
- Healing Salve also restores health to Slardar.
- Clarity replenishes his mana pool from casting Slithereen Crush. Being able to cast his stun more than twice in-lane gives him more opportunities to get kills against lane opponents, and thus more opportunities at gold and experience.
- Iron Branch provides a boost to Slardar's attributes and builds into Magic Wand later on.
- Magic Stick gives cheap burst healing and mana, which can give Slardar more survivability or enough mana to cast Slithereen Crush one more time to secure a kill.
- Boots of Speed are absolutely crucial early on for any hero. In Slardar's case, it greatly improves the potency of Guardian Sprint, allowing him to more easily catch up to fleeing enemies or escape pursuers.
Early game:
- Power Treads's attribute switching can give Slardar more strength for HP and base damage, or more intelligence so he can use more of his abilities.
- Helm of Iron Will provides good sustain in lane and the extra armor makes you very survivable against physical damage in the early game. It builds directly into an Armlet of Mordiggian.
- Magic Wand provides a cheap boost to Slardar's attributes and a quick burst heal. Use it to survive that last bit of damage or cast one last spell in a teamfight.
Mid game:
- Echo Sabre can be a very effective item on a ganking Slardar. The extra hp and mana/regen are welcome on a hero who wants both. The bonus attack speed and instant attack passive synergize very well with Bash of the Deep. When upgraded to Harpoon,allows closing a gap on fleeing enemies.
- Mask of Madness offers Slardar the ability to farm the jungle and reach faster item timings.Another benefit is that Berserk helps stack attacks to reach a Bash of the Deep proc.Later on,it can be disassembled and built into Echo Sabre.
- Blink Dagger is extremely powerful in Slardar's hands, as he can instantly get within range to cast Slithereen Crush. It should be considered a core item in all circumstances, and rushed if possible.
- Armlet of Mordiggian improves his attack speed, armor, and damage, while the HP regen keeps him topped up. The active gives him extra strength and damage, making him much tankier and making his attacks hit harder.
Late game:
- Black King Bar allows Slardar to ignore enemy crowd control spells, greatly improving his ability to kill important targets in teamfights. It also provides bonus strength for more HP, and increased physical damage output.
- Lotus Orb gives Slardar a way to counter enemy target spells, allowing him to disable enemy supports or discourage them from focusing him. It also provides armor for tankiness, and HP and mana regen to allow him to roam independently.
- Overwhelming Blink will allow Slardar to deal magical damage in a big area and greatly slow down enemy heroes whenever he uses it to close the gap onto them.
- Aghanim's Shard will increase the radius of Slithereen Crush and will also allow it to apply Corrosive Haze to enemy heroes affected by it.
- Aghanim's Scepter will allow Slardar's Guardian Sprint to gain additional health regeneration, armor and status resistance while in a puddle or in the river, and it will also increase the radius of the puddle created by Slithereen Crush.
Situational items:
- Solar Crest is an easy mid game item to get,which boosts Slardar's physical damage.
- Shadow Blade is a strong initiating item that improves Slardar's physical DPS and allows him to roam invisibly for targets. Combining Guardian Sprint and Shadow Walk can allow Slardar to move at maximum movement speed while invisible, and allows him to deal backstab damage when attacking out of invisibility.
- Echo Sabre can be a very effective item on a ganking Slardar. The extra hp and mana/regen are welcome on a hero who wants both. The bonus attack speed and instant attack passive synergize very well with Bash of the Deep. When upgraded to Harpoon,allows closing a gap on fleeing enemies.
- Heart of Tarrasque is the best survivability item in the game. Its raw HP and passive regeneration ability allow Slardar to stay in teamfights longer and recover from them faster.
- Desolator is a relatively cheap item that provides increased bonus damage. Its attack modifier can reduce enemies' armor and synergizes with Corrosive Haze, allowing Slardar to shred enemies with his attacks.
- Assault Cuirass improves Slardar's armor and attack speed, making him tankier and increasing his proc chance with Bash of the Deep. The aura gives allies more armor and attack speed as well, and the enemy armor reduction further reduces their physical damage resistance on top of Corrosive Haze.
- Crimson Guard provides Slardar with increased health, damage block and armor, drastically improving his tankiness and allowing him to shrug off most forms of physical damage. The active ability allows him to grant damage block and armor to all nearby teammates for a short time, increasing their survivability as well as his own.
- Moon Shard greatly increases Slardar's attack speed, improving his physical damage output and a greater chance to proc Bash of the Deep. The Shade Sight passive also improves his night vision, allowing him to more easily spot targets while hunting in the darkness.
- Bottle can be a good purchase on a roaming Slardar, as he can pick up runes while hunting for targets (both to refill the bottle and to utilize the runes for ganks). Slardar's small mana pool and being active in early ganks mean that he benefits from a source of HP and mana replenishment, particularly since he can treads switch to get more value out of it.
- Urn of Shadows can be a useful early roaming item if Slardar intends to be very active in the early game. It provides strength for more HP and base damage, making him tankier and letting him hit harder, and provides a small amount of mana regen to help replenish his mana pool. As he can easily get charges from successful ganks, they can be used to heal Slardar after successful kills, and can add damage to future ganks.
- Drum of Endurance provides Slardar with an array of useful bonuses. The attributes give Slardar more HP and mana, the latter of which is extremely helpful for allowing him to cast his spells, and the active provides movement and attack speed bonuses, both of which greatly help Slardar in combat.
- Blade Mail gives Slardar many strong mid-game benefits that can fill in some of his deficiencies. The armor and damage make him a better fighter, and the active lets Slardar use his HP offensively during ganks, discouraging enemies from targeting him in teamfights.
- Silver Edge can be upgraded from Shadow Blade, and greatly increases Slardar's ganking prowess. The Shadow Walk backstab damage is increased, and the break can disable enemy passives that may be preventing Slardar from easily killing certain enemies. It also provides a nice boost to Slardar's stats.
- Monkey King Bar greatly increases Slardar's physical damage and gives him additional magical procs to hit enemies with evasion and high armor to negate Corrosive Haze.
- Eye of Skadi gives Slardar attributes across the board, making him much tankier and alleviating his mana issues. The attack modifier lets Slardar slow enemies with his attacks, further reducing their ability to escape him.
- Mjollnir is a useful attack speed utility item that greatly increases Slardar's chances to proc his Bash of the Deep; as well, the Chain Lightning modifier allows him to deal magic damage around him with his attacks, giving him creep wave clearing capability and augmenting his damage output if he manages to land Slithereen Crush on multiple enemy heroes. Static Charge can further increase his damage output, discouraging enemies from focusing him for fear of proccing the discharge.
- Satanic can greatly increase Slardar's survivability through a combination of factors. It provides high strength, making Slardar much tankier, and bonus damage to further give him more damage output. The lifesteal allows Slardar to maintain his HP, even in the midst of battle, as he can cast Corrosive Haze to increase the amount of damage dealt (and thus the amount he regenerates through lifesteal), and he can use the active to fully recover his HP in just a few attacks as well.